GitHub |
您所在的位置:网站首页 › 戴尔g5 5590 1660ti › GitHub |
GitHub
|
Hackintosh-Dell-G5-5590
💻 Laptop Specs
Dell G5 5590 A70P/M70P/A80P/M80P [RTX 2060 or GTX 1660 Ti models]
Component
Description
Processor
Core i7-9750H 6C/12T (Coffee Lake Refresh)
iGPU
Intel UHD 630 Graphics
dGPU
nVidia GeForce RTX 2060 (not supported)
Display
15.6 1080p (1920x1080) 144hz
Memory
16GB DDR4 2666MHz (8GBx2)
Storage
512GB Intel NVMe SSD
Audio
Realtek ALC3204-CG (ALC236)
Wifi/Bluetooth
Qualcomm QCA61x4A (DW1820) (wifi not supported / bluetooth supported, replaced with card described in next table)
Ethernet
Killer GB E2500V2 10/100/1000 Mbps
Extra Hardware
Description
SSD in second bay
1tb SSD (Crucial BX500)
Wifi/Bluetooth
Fenvi BCM94360NG (ordered m2 card at aliexpress from Fenvi Store)
Tested with:
macOS Ventura v13 (since v4.0)
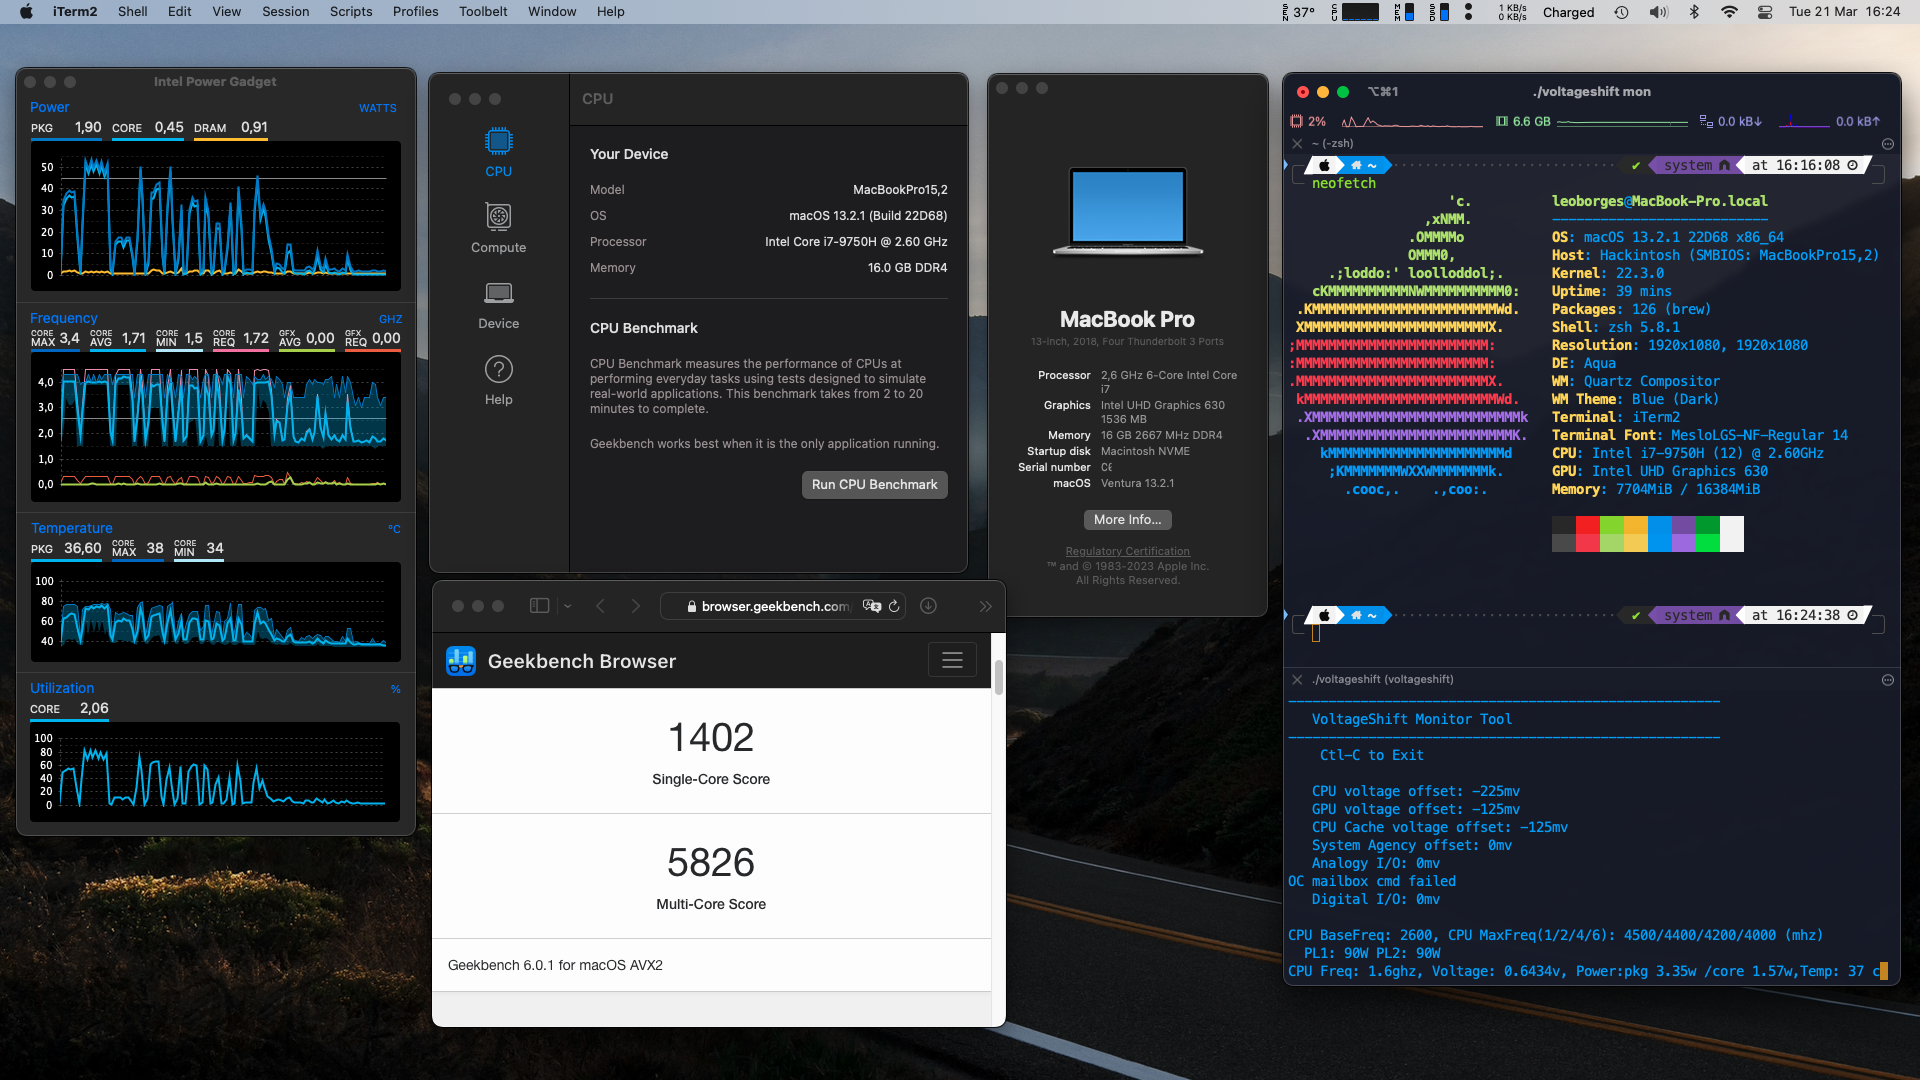
GeekBench 6 - macOS Ventura 13.2.1
GeekBench 5 - macOS Ventura 13.2
Tested with RTX 2060 and GTX 1660 Ti versions, both share same hardware specs (Thunderbolt 3 port) BIOS VERSION (Check your BIOS version before anything) 1.13.2 1.14.0 1.21.1 (Thanks to al-jabirr for testing and pointing out)Updating BIOS will reset CFG-Lock and Undervolting to factory settings, after update you must follow the steps to disable CFG-Lock and enable Undervolting again. MEMORY UPGRADE This build is working with 32gb upgrade, tested with Crucial 2x16gb DDR4 2666mhz modules. Thanks to nerijunior! View original thread Read official guide to understand stuff, not needed, but it's nice to understand what you're doing BIOS SETUP: General -> Advanced Boot Options -> Uncheck "Enable Legacy Options ROMs" General -> UEFI Boot Path Security -> Check "Never" System Configuration -> Integrated NIC -> Uncheck "Enable UEFI Network Stack". Check option "Enabled" System Configuration -> SATA Operation -> Check "AHCI" System Configuration -> SMART Reporting -> Check "Enable SMART Reporting" System Configuration -> USB Configuration -> Check "Enable USB Boot Support" and "Enable External USB Port" System Configuration -> Thunderbolt Adapter Configuration -> Check "Enable Thunderbolt Technology Support" and "Security Level - No Security" System Configuration -> Thunderbolt Auto Switch -> Uncheck "Auto Switch" and Check "BIOS Assist Enumeration" System Configuration -> USB Power Share -> Uncheck "Enable USB PowerShare" Security -> Computrace -> Check "Deactivate" Secure Boot -> Secure Boot Enable -> Uncheck "Secure Boot Enable" Intel Software Guard Extensions -> Intel SGX Enable -> Check "Disabled" Performance -> Intel Speedstep -> Check "Enable Intel SpeedStep" Performance -> C-States Control -> Check "C states" Performance -> Intel TurboBoost -> Check "Enable Intel TurboBoost" Performance -> HyperThread control -> Check "Enable" Power Management -> Enable Intel Speed Shift Technology -> Check "Enable Intel Speed Shift Technology" Power Management -> USB Wake Support -> Uncheck "Enable USB Wake Support" Virtualization Support -> Virtualization -> Check "Enable Intel Virtualization Technology" Virtualization Support -> VT for Direct I/O -> Uncheck "Enable VT for Direct IO" OPENCORE SETUP: Download latest release from Releases page Choose the right EFI folder for you: OpenCanopy AudioDxe: OpenCore with GUI partition picker and boot chime sound. I use this version. OpenCanopy: OpenCore with GUI partition picker Verbose: OpenCore with text only partition picker Open config.plist and make some changes: If you want to enable verbose mode during installation, go to NVRAM->Add->7C436110-AB2A-4BBB-A880-FE41995C9F82, and insert -v on boot-args. To disable verbose mode, just remove -v parameter. Generate your MacBookPro15,2 serials using GenSMBIOS and insert it into your config.plist (under PlatformInfo->Generic). You need to update MLB, SystemSerialNumber and SystemUUID. It's recommended to disable CFG Lock. CFG Lock prevents OS X from writing to a certain region in your BIOS. macOS does this for power management and other reasons, and if it can't access it, it will not boot. You can find instructions for disabling at DISABLING CFG LOCK section in this document. If you disabled it, don't change the lines below. In case you don't want to mess with it, you have to change 2 properties under Kernel->Quirks in order to boot macOS without disabling it: AppleCpuPmCfgLock to YES or 1 AppleXcpmCfgLock to YES or 1 After installation you can make the default OpenCore selection by pressing Ctrl+Enter on the partition you want in the OpenCore boot picker. You can also disable OpenCore boot picker under Misc->Boot->ShowPicker (change to NO). Only do this if you keep an extra copy of OpenCore with boot picker enabled in a USB Drive in case you need to use the OpenCore interface. Remember to keep an USB copy of your EFI folder. Normally I use one pen drive for tests, one pen drive with a working OpenCore version + macOS installer in case I need to do some recovery and stable version on my SSD EFI Folder.
The i7 9750h CPU supports disabling CFG Lock, but it's not disabled by default in BIOS. In order to disable, you'll need to follow some steps: Format a USB drive to FAT32 on a GUID partition map. Make a folder called EFI in the root of the USB Inside this, make a folder called BOOT Download this file and place it inside BOOT Rename this file to bootx64.efi Boot into the USB drive (spam F12 at the BIOS prompt and select your USB drive) Once this has loaded, enter setup_var_3 0x5C4 0x00 to disable CFG lock. You can disable Undervolting lock now too, following step 7 from the UNDERVOLTING section. Enter reboot to exit and restart your computer. You can verify if your CFG Lock is disabled using ControlMsrE2.efi from OpenCore OC/Tools folder. Copy it to your EFI/OC/tools and put the parameters below into your config.plist at Misc -> Tools:
The i7 9750h CPU supports undervolting, but it's not enabled by default in BIOS. In order to enable, you'll need to follow some steps, pretty similar to disable CFG Lock: Format a USB drive to FAT32 on a GUID partition map. Make a folder called EFI in the root of the USB Inside this, make a folder called BOOT Download this file and place it inside BOOT Rename this file to bootx64.efi Boot into the USB drive (spam F12 at the BIOS prompt and select your USB drive) Once this has loaded, enter setup_var_3 0x660 0x00 to disable overclocking lock. You can disable CFG Lock now too, following step 7 from the DISABLING CFG LOCK section. Enter reboot to exit and restart your computer.Now you have undervolting enabled. Next step: download VoltageShit (https://github.com/sicreative/VoltageShift) and extract it. I place the voltageshift folder inside Applications folder. Next make some tests in order to define the best frequency for you. I got a very stable setup using -225mv CPU voltage offset ans -125mv on CPU Cache voltage offset. Start with -125mv in both and then try to rise CPU voltage offset to -225mv: Go to VoltageShift folder using terminal, in my case: cd /Applications/voltageshift Set the desired offset, example: ./voltageshift offset -125 0 -125 (first value is CPU, second value is GPU and third value is CPU Cache). You can try other values for best stability, starting with lower values and going up. If you set to high your laptop may freeze. In this case, hard restart and try again with lower values. Ideally you shoud start with ./voltageshift offset -25 0 -25 and step up 25mv each time. CPU voltage offset can be more than CPU cache offset. I read in a forum people getting good results with -225mv CPU and -125mv CPU cache. I got good results with it too and I'm using it for about a month without issues (I run -125mv CPU and -125mv CPU cache for a couple of months without issues too). After you test throughfuly the settings and are comfortable with System stability, you can apply the launchd in order to set undervolt on boot: ./voltageshift buildlaunchd -225 0 -125 (remember to set the CPU and CPU cache values with your desired values) There's some other parameters you can include on buildlaunchd, like run the utility every X minutes if your system is disabling undervolting after sleep, for example. I'm only running on boot and didn't have any issues so far. Read more at https://github.com/sicreative/VoltageShift
When a new release is avaliable, just download the zip file and update the new config.plist with your old config.plist values: PlatformInfo -> Generic MLB SystemProductName SystemSerialNumber SystemUUIDIf you didn't disable CFG LOCK, change the values below (don't need to change if you disabled CFG LOCK): Kernel -> Quirks AppleCpuPmCfgLock (change the value to 0 or NO, depending on the syntax of your editor. If it's 1 change to 0. If it's YES change to NO) AppleXcpmCfgLock (change the value to 0 or NO, depending on the syntax of your editor. If it's 1 change to 0. If it's YES change to NO) KNOWN ISSUES Some DRM videos won't work. Currently you can view videos encoded with FairPlay 2.x/3.x. External mic not working (only work with bluetooth headset). Already tried to use ComboJack and tested all layout IDs avaliable for ALC236 without success. If you want to dig into this issue, you can read about creating a custom codec at AppleALC Wiki. You can also try to add custom codec into this version of ComboJack (see Add your codec topic). Sometimes unplugging/replugging quickly causes laptop to crash. To avoid this issue, put laptop to sleep before plug or unplug the power chord. I'm revisiting all ACPI settings, but no luck so far. *Update: I found the cause. It's related to turning off dGPU. Leaving dGPU enabled, the issue is gone. Activating it with any method (-wegnogpu boot flag, optimus method, device method in config.plist, etc) will cause the freeze. I'm leaving dGPU disabled because battery life goes down to 30 minutes with it enabled, but you can disable it removing SSDT-dGPU-Off.aml from ACPI in config.plist. I'm looking for solutions to disable dGPU without freezing after unplug. WORKING✅ iGPU Acceleration ✅ Native brightness control (Thanks @caiomascarin) ✅ 144hz display ✅ External monitor using USB-C to HDMI adapter. Other ports (HDMI and Mini Display Port) won't work, they're liked to nVidia GPU ✅ Apple Services ✅ Keyboard with backlight (RGB backlight works, but had to setup at Windows 10 Alienware Command Center. When boot at macOS the config remains, including color. I'm able to work with Alienware Command Center using VMware Fusion to boot Windows 10 partition (as Boot Camp) and connecting Alienware AW-ALC in Virtual Machine -> USB & Bluetooth. Had to reboot a few times in order to work for the first time. ✅ Trackpad with multitouch gestures ✅ Speakers ✅ Microphone ✅ Webcam ✅ USB 2/3/C ports ✅ Card reader ✅ CFG Lock disabled ✅ NVRAM ✅ Bluetooth - Using Fenvi BCM94360NG (Original card worked with bluetooth out of box too) ✅ USB-C video out (using generic USB-C to HDMI adapter) ✅ Ethernet (Thanks @radaelilucca) ✅ FairPlay 2.x/3.x DRM videos ✅ ⚠️ Apple Communications (Continuity, airdrop, etc) - Using Fenvi BCM94360NG (Original card didn't provide support) ✅ ⚠️ Wi-Fi - Using Fenvi BCM94360NG (Original card don't work on macOS) ✅ ⚠️ Thunderbolt 3 (can see device in Hackintosh but don't have any Thunderbolt peripheral to test) NOT WORKING❌ nVidia GPU - not compatible with macOS ❌ HDMI and Mini Display Port video out (linked to nVidia GPU. Use USB-C to HDMI adapter to use external display) ❌ WiFi Qualcomm QCA61x4A (DW1820) - not compatible with macOS. Replaced mine with Fenvi BCM94360NG ❌ FairPlay 1.x and FairPlay 4.x DRM videos ❌ ComboJack (microphone). Headphone work fine, but mic don't work. You'll have to rely on the internal mic or bluetooth headset. SCREENSHOTS AirDrop
If you like this guide and want to help with any value, please buy me a coffee ☕ August 15 2023 (v4.6) Updated to OpenCore 0.9.4 and corresponding kextsJUNE 28 2023 (v4.5.1) Fixed LCD backlight issueJUNE 13 2023 (v4.5) Updated to OpenCore 0.9.3 and corresponding kexts Fixed duplicated files in EFI folderMAY 22 2023 (v4.4) Updated to OpenCore 0.9.2 and corresponding kexts (https://dortania.github.io/hackintosh/updates/2023/05/10/acidanthera-may.html). Updated to macOS Ventura 13.4 using software updater without issues with OpenCore 0.9.2. Added 4k display compatibility (still can't get more than 30hz @ 4k. Not sure if it's a hardware cap or soft cap. Bought an USB-C 4k 60hz adapter from UGREEN but it didn't work. Also didn't work on Windows. I can get 4k 60hz on windows using HDMI port attatched to RTX 2060).View past updates on Changelog.md AboutThis is my "Hackintosh Diary", will be using it to maintain a triple boot Dell G5 5590 a80p between macOS, Arch Linux and Windows. Used Vanilla Laptop Guide from Dortania, but laptop and desktop guide was merged into OpenCore Install Guide. |


【本文地址】
今日新闻 |
推荐新闻 |